62 Megapixels from a Mavic

One of the features of the Mavic 2 Zoom is the Super Res mode. Super Res creates a multi-row panorama that starts at the wide end of the zoom range to compose, and when you hit the shutter button it zooms in and takes 12 images, stitching them into a panorama that covers the original field of view.

I have not used that much, since it creates a JPEG rather than a RAW file, which among other problems loses too much dynamic range. Unfortunately due to the nature of RAW, it is not really possible to save a panorama in RAW. RAW takes the data directly from the sensor and writes it to a file, and that only really works with one image.

Then, I found buried in the settings: “save originals in RAW|JPEG”

In DJI Go 4, select Camera Settings > General camera Settings > Turn on “Save original panorama”, and then select RAW. 

Eureka!

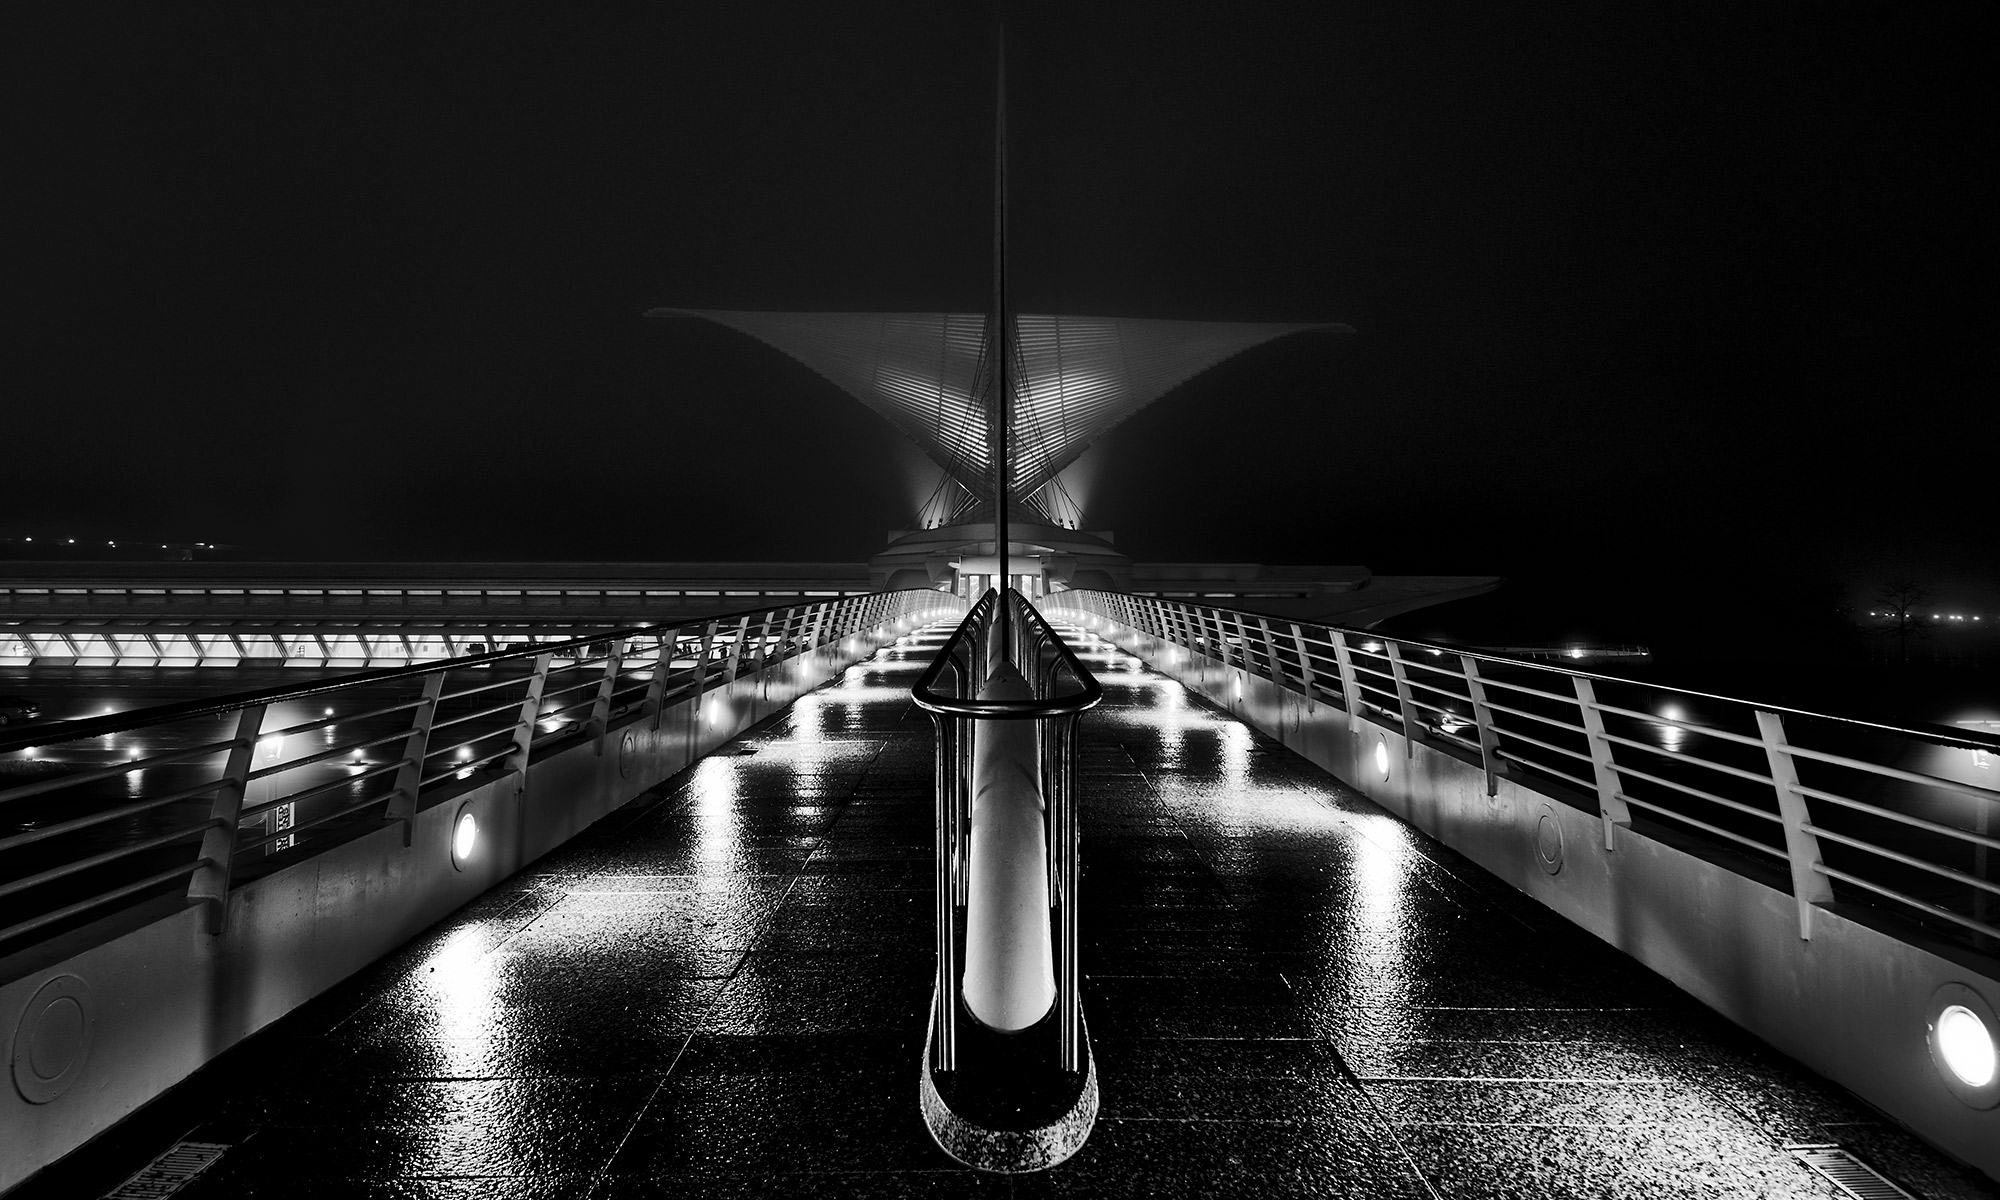
With this I am able to get access to the full dynamic range of the camera, and really high resolution. 

Super Res image, original is about 62 Megapixels
100% crop, bottom center

So far, my workflow is like this:

Import the images into Capture One (or your favorite editor), and edit one of the images. I usually pick either the image with the most of the main subject in it, or the most contrast to set black and white points.

Once you are happy with this, copy the adjustments to the remaining images. Double check them all to make sure the adjustments look alright across all the images. If any further adjustments need to be made, they need to be copied to all the images. 

I export the images as 16-bit TIFFs, which stores the most data, and gives the final panorama almost RAW-like editing options, but take up more space, so you may want to remove them after the panorama is stitched. 

For stitching, I usually start with Photoshop, which is very good about 80% of the time, and pretty much useless in the other 20%. So far the Super Res panoramas stitch well in Photoshop. 

Once the stitch is done and you are happy with it, crop the image, flatten the it, and do any final color and exposure adjustments in Adobe Camera RAW. 

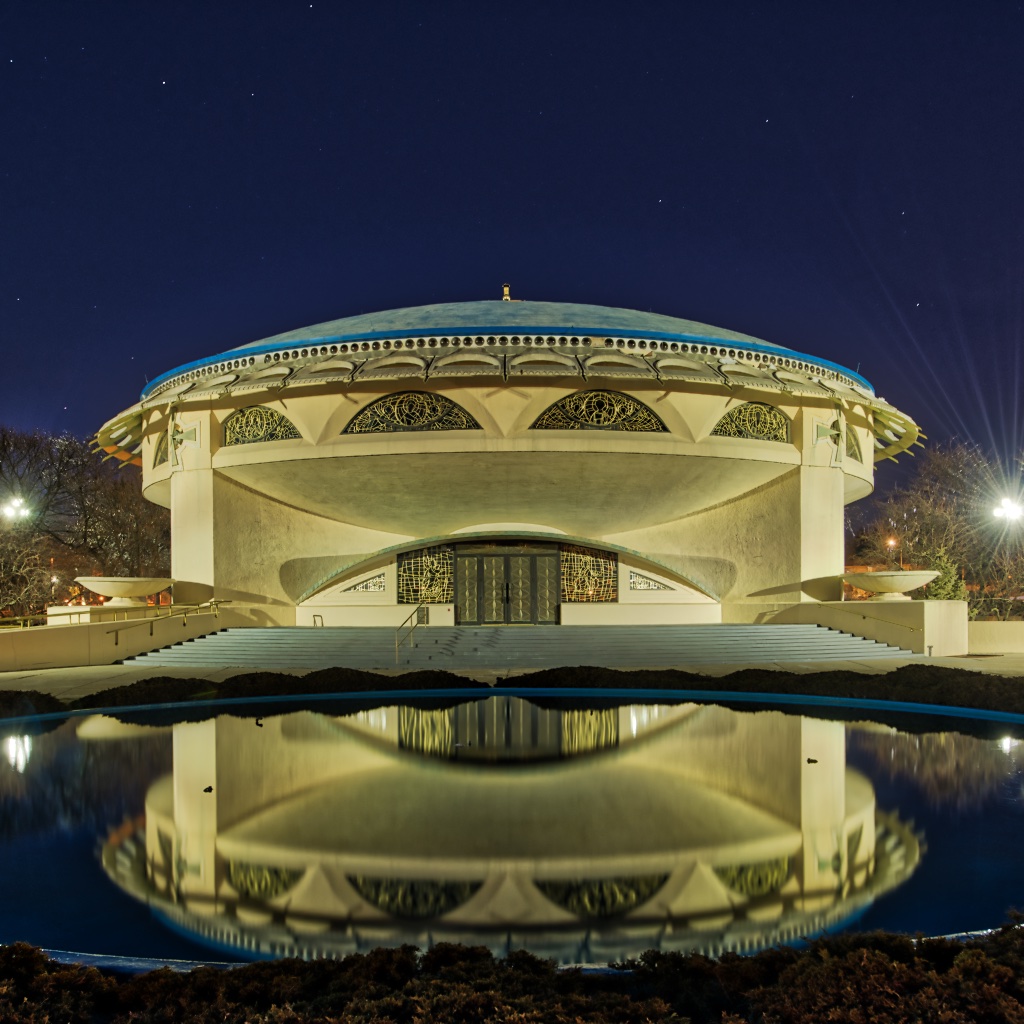
The final images that I created were around 62 megapixel, since you an get a little more around the edges than the default stitching in-camera.

Having the ability to create high resolution images with reasonable dynamic range in RAW format really adds to the flexibility and value of the Mavic 2 Zoom. 

You can get the Mavic 2 Zoom from DJI or Amazon. (Affiliate links)

What Are Optical Brightening Agents (OBAs)?

As you shop for photo paper, or look at my Paper Finder, you may run into papers claiming to be OBA free, or low OBA. What are OBAs, and why would you want to be free of them (or not)?

OBAs are Optical Brightening Agents, also known as Optical Brighteners, Ultraviolet brighteners, or artificial whiteners. When hit with ultraviolet light, they fluoresce, emitting a blueish light that makes the paper look brighter and whiter.

Brighter and whiter are two things we want from our paper, so what’s the problem? The main problem is that the OBAs degrade over time, becoming less effective. This makes the paper look less bright over time, and since the light that the OBA emit has a bluish tint, the apparent color can shift as the OBAs degrade.

If you are unsure of the OBA content of a specific paper, looking at it under a blacklight is the fastest way to check. Papers with OBAs will glow a bright bluish white, while OBA-free papers look a dull purple or pink.

Three different papers under a blacklight, Left to right: Canon Pro Luster, (High OBA), Red River San Gabriel Baryta 2.0 (“Low” OBA), and Breathing Color Signa Smooth 270, an OBA free fine art paper.

The same papers under normal light.

So, should you always avoid OBAs? Probably not. With normal prints the trade off is probably worth it to get the bright white that we expect with a photo paper. Most “photo” papers contain OBAs, so other than a few high-end baryta papers you are going to have OBAs if you want a classic photo look. Photos in an album are probably not going to degrade enough to notice, photos that are properly displayed under glass should look good for many years, and photos displayed in less than ideal conditions can be reprinted in the future. Even fine art prints on archival papers need to be displayed correctly to get the full archival benefits of the materials used.

I have also seen it recommended to display prints under UV blocking glass, since it is the UV light that not only fluoresces the OBAs, but also degrades them. Based on my understanding it seems like this would just make the print look like the OBAs had burned out, since no UV light will fluoresce them. If you are looking for archival permanence, you are probably better off starting OBA free, but if you have a print you want to protect this is probably the best way. Incidentally, even OBA free prints will last longer displayed under UV glass.

In fine art prints, longevity is of paramount importance. This is especially true with limited edition prints, where the photographer commits to only print a certain number of prints, so reprinting is not an option. In the case of selling prints, the buyer should also be considered. Fine Art buyers frequently know exactly what they want, and may demand OBA-free papers. On the other end, people buying postcards or greeting cards may want a photo look, and not expect archival permanence.

Test some different papers (Amazon list, affiliate link), and see what results you like, or check out my paper finder, where you can filter based on OBA content.

MGIC Headquarters Building


Designed by Fitzhug Scott-Architects, Inc. of Milwaukee and Skidmore, Owings & Merrill of Chicago, and completed in 1973, the four story MGIC headquarters building is constructed in a unique inverted pyramid design, with each floor extending fifteen feet out from the floor beneath. It is one of several buildings on the MGIC Plaza overlooking Red Arrow park in downtown Milwaukee. 

This photograph was a single ten second exposure, taken on a Nikon D850 at ISO 100, 24mm PC-E tilt shift lens at f/8, and processed in Capture One Pro 11 and Adobe Photoshop (removed a security camera near the roof). Using the color editor in Capture One I was able to tone down the yellow cast in the building from the lights.

Gear and software mentioned (some affiliate links):

Camera: Nikon D850
Lens: PC-E NIKKOR 24mm F3.5D ED
Tripod: 3 Legged Thing Winston
Software: Phase One Capture One Pro

Annunciation Greek Orthodox Church

Annunciation Greek Orthodox Church in Wauwatosa, WI.

Annunciation Greek Orthodox Church in Wauwatosa, WI. The church was designed by Wright in 1956, and finished in 1961, about two years after Wright’s death. While departing from the traditional Byzantine architecture common in Greek Orthodox churches, Wright incorporated the domed structure and traditional colors into his design.

More information about the church is available on their website, http://www.annunciationwi.org/.

This photograph was taken well into nautical twilight, about 45 minutes after the sun set. It was taken with a Nikon D850 at ISO 100, a 24mm PC-E lens at f/5.6,  on a 3 Legged Thing Winston tripod. It is 3 exposures, 1.6, 6, and 25 seconds, and processed with Aurora HDR 2018.

Gear and software mentioned (some affiliate links):

Camera: Nikon D850
Lens: PC-E NIKKOR 24mm F3.5D ED
Tripod: 3 Legged Thing Winston
Software: Aurora HDR 2018

Tips to Clean Your Own Sensor

Few things are scarier to the average photographer than the idea of cleaning your own DSLR sensor, but if you are careful it is not difficult to do safely and successfully. That said, it is possible to damage your camera, so be slow and careful, and I am not responsible for any damage that you do to your equipment. Read any instructions on cleaning supplies and tools, and follow them over this post.
Sensors need to be cleaned when dust, oil, or other residue is left on in. It is natural for this to occur, and needing to clean the sensor occasionally should not be considered a malfunction. Junk on your sensor is most visible against even backgrounds, like a blue sky, and at higher apertures, although in some cases it will be visible even against busier backgrounds.

dust spots on an image.
A sensor that needs a cleaning.

If you see dust spots on your images, it is time to clean your sensor. If you can see the spots in your viewfinder, the problem isn’t in your sensor, it is ether in the viewfinder or the lens.

Continue reading “Tips to Clean Your Own Sensor”

D850 Early Review

I stopped in to the local camera shop over the weekend to put my name on the list for a Nikon D850 (affiliate link), but they actually had one in stock, so I got to take it home immediately. I am normally not on the constant need for the latest and greatest bandwagon, but there were a lot of improvements compared to my D610, and I felt it was worth the upgrade. So far that has definitely been the case.
The headline is the 45.7 megapixel images, but there are a lot of features beyond that to make this a compelling camera.

Continue reading “D850 Early Review”

Five Gift Ideas For Photographers

Having trouble finding a gift for the photographer on your list? It can be difficult since not all accessories work with all cameras, and it is difficult to know what they have and what they could use. The following are a selection of consumable or semi-consumable items, or the you can never have too many kind, that are useful even if the recipient already has one.

Links are affiliate links (I get a percentage back if you buy through them), but these are all products that I buy and use.

  1. Sensor Gel Stick* (~$60) – This one and the next are specific to DSLRs or interchangeable lens mirrorless cameras. Digital camera sensors get dirty over time, and there are several specialized tools to clean them. The gel stick is a block of adhesive gel on a plastic handle that makes it easy to pick up dust from the sensor. Although cleaning the sensor can be scary if you are not used to it, it can be done by anyone, and most cameras include a function to lock the shutter and the mirror up.
  2. Sensor Swab Kit ($15-$20) –  When the Gel Stick isn’t enough, sometimes you need to use a swab and cleaning fluid. These kits contain both. You will need to know if they need full frame* or crop sensor* sized swabs.
  3. Lens tissues* (<$10) – While microfiber cloths are the most common these days, some people still prefer disposable tissues, since there is less likelihood that they could pick up bits of grit that could damage a lens. Previously I have used microfiber cloths, but am planning to switch for that reason.
  4. Think Tank Cable Management* bags ($15-$30) – Don’t let the name fool you, these are very handy for organizing anything, not just cables, in your camera bag or luggage. With a clear side, it is easy to see what is in them if you have a few. There are several sizes, the 10 or 20 is probably a good starter.
  5. Training (various) – training is one of the most valuable things you can get a photographer. A KelbyOne membership (use this link* for a $20 discount on a one year membership) or courses from CreativeLive* can take a photographer’s work to the next level. I use training from both, and they are both great. Pricing is on two different models, CreativeLive is an outright purchase, you buy a class and it is yours to keep. KelbyOne is a subscription service, you get access to all the classes for as long as you are subscribed.

Have you given any great photography related gifts? Please share below in the comments.

* These links are affiliate program links through Amazon or the associated vendor. If you follow the link, I get a percentage back to help maintain this site and bring you more content.

3 Legged Thing Winston Review

As much as I like a tripod to be small and easily portable, sometimes you want a more stable tripod, especially for things like panoramas, shooting at night, and long exposure photography.

I recently picked up a 3 Legged Thing Winston (buy at Amazon or Adorama, affiliate links), their largest tripod. I picked the 3 Legged Thing for a few reasons, I have one of their Punks Travis  (buy at Amazon or Adorama, affiliate links) tripods, and like it. I use the monopod leg often enough that it is a definite added value. The head also comes with a pano clamp on the QR part of the head, so it can be leveled independent of the tripod, critical for panoramas on uneven terrain. Continue reading “3 Legged Thing Winston Review”